mid-October 2019 UPDATE BELOW
March 2019 was the first time I went public about potentially going public with making jewelry … and someone from @Make responded! Here’s the screenshot of it.

This website has been set up to dip my toes into the waters of a ‘real-ish’ website.
I’m in the process of learning how to start a business and set up a shop and a proper website. Once I figure it all out I’ll launch a lifestyle blog on thesterlingyears.com and set up shop to sell what I make on teagardenjewelry.com and post on projects on oneseedwonders.com. It feels like a good idea to separate life from projects and the work. If I get time to edit some of the stories I’ve written, there might even be an authors site using my real name!
I have quite a few, possibly too many, interests and one really seems to have taken over my life in retirement, at the moment. Jewelry. Jewellery. How many ways can I (mis)spell it? Reminds me how I got into pottery – by mistake … looking for a poetry book in a bookshop. I grabbed a pottery book off the wrong shelf in a bookstore … loved what I saw and so began my foray into ceramics while loving how it added a new dimension to my drawing and painting portfolio.
Jewellery. The first class I took was A Jewellery (or Jewellery A) class because that’s how it was spelled and referred to on the Continuing Education Class Roster. I knew I needed to get out of the house after Mom died and decided to try something new because I didn’t want to come home in the middle of Winter wet and covered in clay anymore. I live in Canada. I also need to work small. I have limited space in my condo and had been doing miniature paintings so this appealed to me on a few levels.
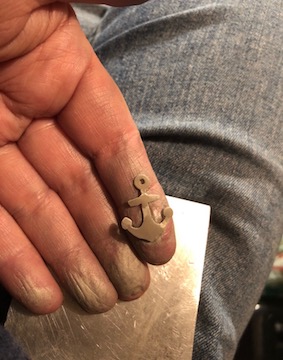
My first commission.
I made this anchor earring for my brother, Gary.
He has a couple of sailboats and a tiny home he’s renovating on little Island called Mudge, where there are about 100 other Mudgekins, just off Vancouver Island.
Claude from The Beadery store on Queen Street West helped me with it. Here he is showing how to make the rope by winding .999 wire with his drill. I did ask if I could take his picture for my post (but I think he was thinking, ‘really’ – lol).

WOAH! I needed to know how to do this … next I needed to figure out how I could take a little rope and solder it onto the anchor cut from sterling sheet metal and texture hammered. I thought I might have to make tiny jump rings – not really (I was going to buy a chain and just have to make 2 jump rings and somehow figure out how to attach it). I just soldered this and bam – done.
I sandpapered it to this state and was about to polish the anchor even more with my new foredom polisher but when I showed Gary the unfinished piece, he said, “Stop.” He liked it in the rough state.
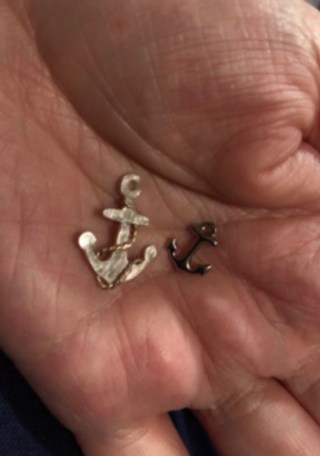
When he first said he wanted an anchor earring, I’d shown him this little charm my bff had given me when we were 16 … I wanted to make sure we talking about the same thing and on the same page.
[Backstory: my best friend had given this charm to me just before she suddenly died. It’s pretty special. So is my brother. I know. What a metaphor – an anchor – right.]
I was going to give it to him but when he asked if I could make him one a bit bigger, I decided I would try. It also meant I could still keep the little one and hang on to those big memories that come in small packages.
Gary’s best advice to me about jewelry-making has been … ‘Sister – you can NEVER have too many tools!” Ha Ha. He works in wood … on boats and yachts and homes.
And so, like him, I just keep buying what I need when I need it – there’s been no looking back.
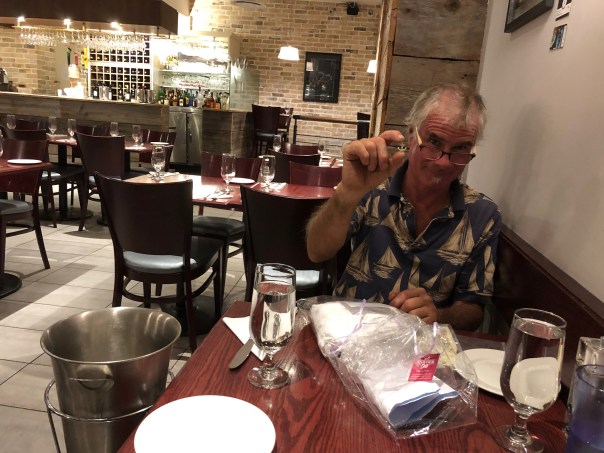
Here he is opening his birthday presents. I also got him a custom monogramed tee shirt from Tania’s Etsy shop to go with it! Tania, like myself, is a member of the tizzitcircle, a global community of makers supporting one another and brainchild of Deborah Engelmajar.

Of course, I am hoping the anchor now opens up the pirate jewelry market for me now.
AND
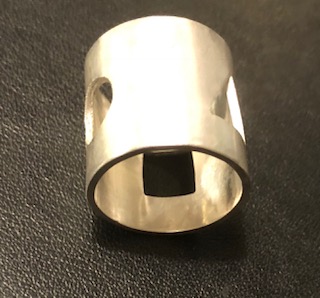
then there’s this little ring I made for myself.
It goes this way …

and that way.

It was just for fun. It’s adjustable and floats over my middle finger and/or my baby finger … depending on how I want it any given day!
I wore it to a studio party and it withstood the test of packing and unpacking bags full of serving trays with various cheeses, fruits and vegs coming in and out … then doing wash-up, cutting and prep with my friend. It’s sturdier than it looks!

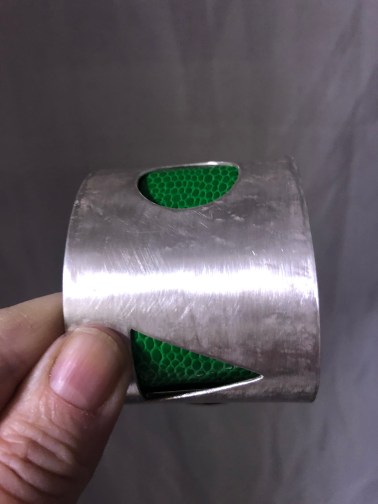
I started on a more complex project … the pendant (below). It can be worn front-to-back … or back-to-front … so it shows off both sides of the stone.
I’m using different bezel techniques on each side.

… some close-up progress shots below
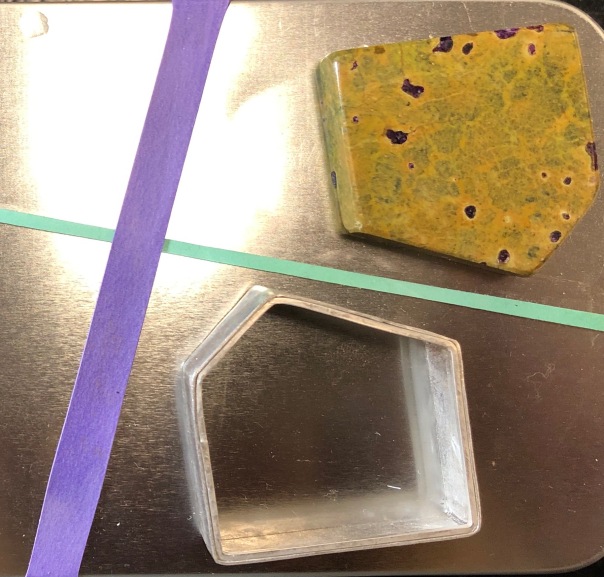
I keep it and all its bits in a tin held together with pretty elastics 😉

… and here’s the bezel from the back.
It’s almost perfectly aligned to fit the stone now (a few more thumps with a hammer and squeezes with pliers) … it’s not yet soldered … still working on setting that square wire inside so it fits perfectly without any gaps … solder doesn’t like gaps!

Square wire is now sitting flat against gemstone and the gemstone fits nice and tight within the bezel frame.
You can’t see me but I’m dancing around the dining room.

Here you see the square wire separated from the bezel frame.
I have to clean it.
Solder’s such a fussy friend – it doesn’t like dirt either.

And here is what it looks like on the other side. I’ll be sanding it down, straightening it’s sides and bending down the edges to set the stone in once I finish soldering on a chimney bale.
I have to make a fake chimney first using cardboard so I can solve all my mistakes (and don’t think there won’t be many because for sure there will be many judging from all these wonky angles and the fact that I want to have it flat at the top where the chain slides through – so it hangs well) … or will it and do I really want it to – hmmm?
I will make the chain.
It will have big wonky links and a single, round, matching, yellow Jasper sun bead floating above this little tiny house … on the side opposite the chimney.
Balance, my friend. Balance!
I have another couple of projects on the go as well.
This ring needs more polishing. It fits on my thumb, too, and I can twist it to show different shapes depending on the day (or time of day).

Small things … ah but you’re smiling, too, I see.
circle, triangle and square cut-outs
I have plans for them all
and all will be revealed
ok
a couple of hints
 AND
AND
OH
AND
I will work on matching bracelets

AND
there will be a different more affordable line
with pop-ins and cross-over investment pieces
but
maybe I’ve said too much
IT’S JULY
and TIME for an UPDATE
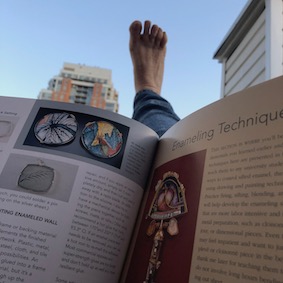
I finished my last class in Enameling on Tuesday evening (23 July 2019) and got enough done to say I am officially hooked on cloisonné and champlevé.
I ordered a kiln from Paragon after my 3rd class and it’s is due any day now!
The point of the class wasn’t to finish pieces but rather to get into the habit of testing to see how various opaque and transparent enamels react. We learned to take copious notes and to be curious and experiment – to use our intuition and go beyond what our notes said. As I type this, I am thinking maybe the teacher would want to correct me on this statement – haha. This is what I obviously did to learn when what was in our notes eluded me. I became brave and willing to lose a piece to the process. Working with copper rather than pure silver made that possible because the cost of pure silver is higher.
With that in mind, here are a few pieces I did. With what I learned from doing these particular pieces, I will be trying to refine the results and advance my repertoire.

You can see that I’ve added a chimney bale and a little door to the little house bezel. I’ve also decided to make more bezels like this to frame enamel pieces.
In order to have the pendant hang properly, I felt I had to solder a bar inside the bale much to the horror of my teacher who later told me she thought I might melt the entire piece … and it didn’t really do a whole lot to fully correct the slight angle the house falls at when on the chain when hanging around my neck … (and don’t tell anyone, but now I can’t fit the clasp and chain through the bale either) tee hee. [Good thing I didn’t make the big, wonky, link chain like I said I was going to. I will solve this! I will make more and I will make the big, wonky, link chain, too.]
The red I used on the front is Thompson Orient Red. If I remember correctly, the green I used is a Thompson opaque enamel called Bitter. I sprinkled a single, light layer of enamel powder over a wet stencil I had carefully cut out of vellum on glass with a sharp x-acto blade and decided to call it a day because I liked the texture and transparent quality that was produced.

I went with Flame Red, a darker Opaque on the back. There was a little burning around the top edge but once the bezel is pushed down over the enamel, it won’t show. There are some really great effects that can happen burning reds but this was not one of those intentional burns … and I need to admit to a fair amount of beginners luck with many of these as they were first firings I’ve ever done.
I did listen to the teacher though! So there is a lot of thAt, too!

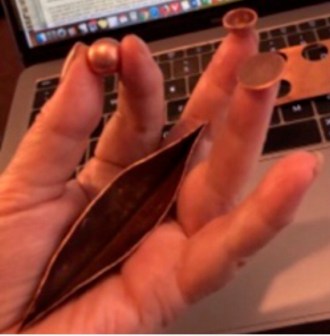
I decided to attend a day workshop to learn how to use pure silver metal clay and see if it might be something I’d like to explore further. Back in the mid-80’s I worked with plasticine doing claymation for Animation Group so trying it again brought me back to those good ol’ days. I think it would be easier to punch out my shapes and fuse the frames than to do all the fussy work involved in trying to achieve the same thing. I’ll have to see how these two pieces turn out though after I play with them and a little more fire.
Remember I said finishing the pieces isn’t what the enamel class was about!
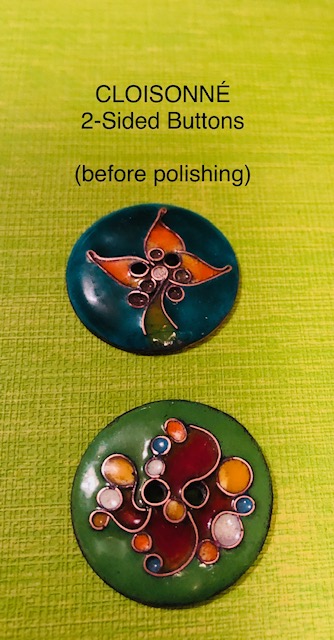
can you see the 2 holes where rivet screws will go to hold them together
I have some pickling and another layer of enamel to add in places on both buttons and then more pickling and some wet diamond file buffing to do. All in all, though, I had fun designing these. I will bring wires over the edges another time and be more careful layering certain enamels over others. There was some cracking that happened as a result of either not enough counter enamel on the back or different firing temperatures of enamels being layered over others. Nobody knows this but I dropped one of the buttons in the kiln and it flipped over backwards and landed flat on its face – there were toffee strings attached to it and the wire grill as I lifted it up. I didn’t panic and chipped off the stringy bits, refired it and voila. It did though result in overfiring the pieces (I can’t even remember which one it happened to now I was so traumatized at the time that I started to see flaws everywhere and think more would be better on both buttons) … next time something like this happens I think I will take a break and go back to my work after I’ve thought things through more. It was the last class and everyone was rushing to try to finish even though we knew we weren’t expected to be doing finished pieces.
It’s a process – all this learning.
Oh.
One. More. Thing.
I have begun making … rings & things
It’s a SPRING

It’s a RING

It’s a THING

AND
It’s a PENDANT


It is EVERYTHING!
along with other enamelling ideas with these little silicone pea beads
Stay Tuned.
for more info
on my soon-to-be shop!
AUGUST … And Another UPDATE!
I got a red hammock to read in for the newly renovated roof deck.

It’s where late afternoon daydreams are now happening …

I’ve begun making floor plans for the home studio. Now for a huge spare room decluttering. It’s where everything has gone to live while I worked. Now I have decided what I’m doing with this stage of my life – so this should make the job a lot easier!
Oiy Yoiy Oiy!

Yesterday, my first order from Rio came in. How very exciting opening that package.

Let the costing and spreadsheets and accounting begin. I love it all.
I actually think I love sitting.
There’s been a push on this past month to walk to yoga classes because I discovered this.
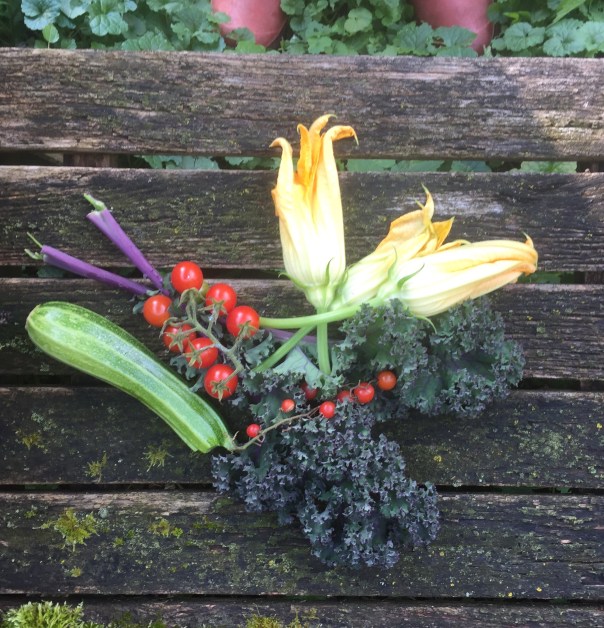
Also, I’m gardening.
Lots of tools
… and colourful jewels happening in the August Garden.
See y’all again in September!
I signed up for a lost wax carving course that begins then.
Quick Late September Update on the lost wax class – I AM TOTALLY LOVING IT!
I am also going to begin painting again. I loaded up with some new watercolours and gouache and signed up for a refresher botanicals illustration course. It should be a lot of fun. I want to draw and play with colours before I jump straight into enamelling. This will open those doors for this. Once I get going I’ll share sketches and take process photos.
I also signed up for an open studio session at BeadFX, here in Toronto, to finish polishing the cloisonné pieces above under guidance using a JoolTool which I’m now thinking of getting. It seems like it would be good for finishing cloisonné pieces and once I learn lost wax techniques, I will need something substantial to grind and polish cast work. I could get a foredom grinder and their filtration system but from what I’ve seen and heard about the JoolTool, its attachment system has an amazing vacuum/filtration with powerful capabilities according to Melissa Muir and others I’ve been speaking with. I also like the fact the hose can be easily detached to clean up other messes that happen in and around the bench.
I’ve now attended 3 lost wax classes and we’ve finally started to work with the materials after two concentrated evenings of demos and lectures.
As I said. I AM LOVING IT!
but there might be a strike
Here’s what’s on my bench right now …

I have ordered wax and some tools so I’ll be ok in terms of being able to keep carving.
I’m glad we had the lectures and demos but really hope this threat of a strike does not come to pass for everyone’s sake. With luck, things might be resolved swiftly if things do go off the rails with talks. Fingers and toes crossed.
I’ve joined a number of new FaceBook jewelry groups and am interacting with others on social (I still have to get the hang of Insta) … I get Twitter but it’s not the same as FB and Insta … and am in the thick of learning how to set up the business part of all of this on a couple of paid Membership sites.
I’ve worked out a logo and colours now for the dedicated website and shop!![]()
AND
and one for the new blogging site, too![]()
Let’s keep learning, designing collections, making and sharing what we know.
Thanks for following everyone.
I’d love to hear what you are all up to, too. See you back on FaceBook!
Mid-October Catch Up
I spent an amazing day on Saturday, 12 Oct, in the BeadFx store/studio workshop where I went to meet Christine who helped me try out two great pieces of grinding equipment. I’m trying to make up my mind between the two and think I’ve decided against the JoolTool in favour of a Diamond Pacific Pixie.

Here’s a photo of me working on the JoolTool polishing my enamel buttons finally.

And here’s a photo of the Genie that I was using in the BeadFX enamel studio to finish its sister button. The Genie is a larger version of Diamond Pacific’s Pixie that Christine suggested I look at. She owns and loves it. It can be adapted to dry polish metal with the Jeweler’s Buff Kit. I am so lucky I called and she answered the phone because there seems to be some serious differences between the two machines. The JoolTool took longer and felt a little dangerous. At one point, even though I was being ultra-careful, one of the buttons went flying out of my hand and landed quite a few feet away on the cement floor having been flung sideways to my right. Christine came running in to see if I was ok. Fortunately it didn’t crack and fortunately, she wasn’t coming through the door when it went flying towards it! A couple of times I could feel it catching even though I was holding onto it tightly. I also felt that if my piece was even just a little larger, I might have trouble getting it into position to easily polish the centre of it. I would not have been able to grip it as firmly as I tried to get the machine to polish the middle and can’t say I like the idea of an even larger piece flying through the air. Not so with the Genie. I didn’t have to hold the piece at all as it gently was pushed up against the wheel. Cupping it in my fingers was enough to securely hold it in place while polishing it. To release it from the wheel, I merely let it drop from the wheel. If I lost hold of my piece, it would have been sent to the back of the machine, away from me and would have been easy to recover. Nor did I have to incessantly dip it in water as I had to do with the JoolTool. With the Pixie, there was a continuous stream of water flowing from the bucket system set up at the side on the floor (so no plumbing required). The thing I liked about the JoolTool though, was it’s small footprint. There was a vacuum that came with it but it didn’t seem all that powerful. Working wet meant I didn’t really need it to be on. If I were working dry, I would want it on. I’ll have to take a look at an extractor if I go with the Pixie but really putting on a vacuum as I work would do the same as JoolTool’s system would. The Pixie will have a slightly larger footprint and require space beside it for two buckets but it was at least twice as fast and felt so much safer and easier to use. When all is said and done, I think their price points would be similar.
If you have a special love for a polisher, please let me know more. I know many of us use a diamond hand file and polishing papers. There’s nothing like the slow, meditative approach to take the stress out of a long day. I’m in no hurry now to make my decision on polishing equipment but it sure was fun to try these two machines out!
2020
Holy Moly – time is flying by. This means we must be having some fun – right.
I’ve completed the wax carving class and began upping my game using precious metal clays. I created a few wax rings and casts for use with the pop-ons though I’m now wondering if clay might get me here sooner. Clay will still allow me to have molds made for casts and sizing gets a little easier (once sizing in PMC is mastered. There are definitely some tricks to be learned for this with some easier than others. And there are compromises with some methods. My learning curve was already well off the richter scale months and months and months ago. Holy Moly (I know how Joycean … back to the beginning, again).
OK – but seriously, there’s been a lot of old and new knowledge being put to the test since December when the last class in wax ended.
I opened Sandra’s Pink Lotus Blossom Champleve Pendant kit and have been playing with it and watching her many instructional videos on Vimeo. I purchased the kit from her Etsy store many months ago and am working my way through her instructions, step-by-step. And, get this, in June, I will be attending Sandra McEwen’s workshop in Levis at Casa Artistica. I am so stoked! I’ve booked my stay a hop, skip and jump away from the studo. When I told my brother about it, he said, “hey – that’s where I was born.” I always thought he was born in Quebec City which is just a hop, skip and jump away from Levis.
Here’s a shot of me sawing through pure silver sheet using a better blade than I used on the larger pieces below. Believe me, you need to get decent saw blades. I ordered these laser gold blades from Rio (no one said jewelry materials and tools were inexpensive).


Why just yesterday, I did just as she suggested and tried fusing a test piece of pure silver using her friend, Lilian’s Blue Fuse (which Sandra demo’s how to make using cupric acetate powder and clear fyre) and I melted the entire front and wound up with a grid of gunk on the back. She promised we would melt our fair share and said, “GO FOR IT!
Working in a communal studio comes with huge advantages along with some minor drawbacks, ie; the screen was covered in op’s project residue. To solve this, I will either bring my own clean screen, if necessary (I plan to try this at home using my butane torch now). I suppose this is as good a time to mention I took torch training last week and am now confident playing with fire. More on this Artspace Jewelry Studio a little later.
If we’re not making mistakes, we’re not learning is a practical new motto that helps keep me moving forward these days.
WOAH – UPDATE on THE UPDATE: Sandra’s new Vimeo video was just posted yesterday and it shows how to use an EZ-Torch … which is exactly what I need to be shown right now.
I can’t barely keep track of all the coincidences happening now that I’ve decided to wrestle jewelry-making to the ground.
AND THEN COVID-19 LOCK DOWN shut down the jewelry studio and half my tools went into lockdown for about six months.
To be continued…
To see what I’ve been up to though, visit @gardenbre on INSTAGRAM where I’ve been posting regularly ever since … le sigh. fyi – I am getting ready for a Fall 2021 pre-launch.
