visit the shop here
and
read the opening post here


I received a complimentary pouch of the well-known Dragon Well Lung Ching Green Tea to try from umiteasets. When asked to chose a type of tea I would like to do a tasting of, I put the ball back in their court and asked them to choose for me based on what they would think I might enjoy based on my Instagram posts. I don’t pretend to be an expert on tea by any stretch and I have not made even a small dent in the spectrum of teas to be tried – though I know what I like and that I like way too many teas for my budget.
I had switched from black teas to drinking green by the time their package arrived. This decision had a lot to do with the weather. It’s getting hot here in Toronto. They choose well. I will start by saying I really like this tea.
It makes a refreshing Summer beverage both with and without ice, plain or blended with subtle additions like rose petals and/or orange. This is not to say, I feel it doesn’t stand on it’s own but rather it speaks to its versatility. After all, it is one of the top ten Great Teas of China.
I’ve written a couple of posts on Instagram about it. The first post went into a description and tasting notes I enjoyed and the second post introduced blending it with citrus. At some point, I will make a Jun kombucha with it as I fully expect it will complement it’s delicate flavours.

This is a photo of my first really serious solo tea session … it was taken as I was about to take notes upon trying a tea I had confidence was good and after much exploratory listening, reading and watching. My first tasting notes can be seen in the photo here. I used red pencil to overlay points over my own on the tasting wheel made by the pros. I love a good visual. It shows I was close enough to feel ok to move ahead with some confidence.
The photo was taken just last week. I call it my first Real Tea Tasting Session. It really isn’t.
I will refer to it as my first intentional tasting … the one I took shortly after doing an involuntary tasting … one that was more of a joke – a bad joke. I’ve played at tasting different types of teas for a few years now. Making kombucha and jun introduced me to some more exotic varieties of tea and resulted in an initial awareness of the gongfu tea ceremony.
The tasting before this one was done with a button of tea tossed into a strainer in a cup. The tea was a roll of the dice purchase made while purchasing a fancy teacup online. I should have known – right. I decided to use it to overcome my fear of putting pencil to paper and fast found me laughing my way back into the kitchen, teacup in hand, to dump the contents. All I had tasted after getting to the first brew stage was a fishy, weirdly odd, couldn’t-quite -put-my-finger-on-it watery taste that I knew I’d tasted before. Foul water I found next to impossible to describe. The visual: a near-clear, liquid. My eyes rolled. I laughed and thought what else could I do. Then I seriously slumped into questioning $pending so much … on so much tea (really I only spent $3 on this particular tea tuo but still … there’s more.)
So much time consumed … and so much information … all for such a disappointing toe dip in the seas of finding my own tea voice. They said it was one of their best selling teas. And, it was an aged pu’erh … picked in 2010 … more floral and sweet than their other pu’erhs. Only now I notice there’s a typo … that should have tweaked my interest a little more maybe … it “goes down sooth.”
I remained together enough and curious enough to wonder what ALL the others had to say and very quickly discovered someone HAD posted about the brew’s fishiness!
VOILA – totally hooked and took more bait … dove in for a more serious “sess” and had success … with a different tea. Black Yunnan.
So hooked and happy to proclaim there are no discernible fish-tasting notes on this one – phew!
When I bought this Black Yunnan Tuo, I made sure to read all the comments about it first. Teaheads on the UK site I purchased it from went out of their way to say this 30+ year old, relatively, inexpensive, ripe, pu’erh tuo had no fishy taste. They are correct. I purchased it here. Don Mei’s video about Fishy Tea goes into more depth as to the hows and whys. I’ve purchased a fair amount from them now and feel confident that what he and Celine bring in is top quality. Their enthusiasm and authenticity is palpable.
Back to fishiness. Fishiness is a thing I had no idea existed in tea tasting. I’d never experienced it nor seen it as a touchpoint on any tasting wheels … but WOAH – now I was seeing write ups about it everywhere … there was no mistaking the aroma and taste. I found out fast, a little more about tea tasting than I was actually ready for. Prepare to begin wracking your memory for vague recollections of all the things you’ve ever had in your mouth because what I’m finding covers the spectrum
Fishiness is most likely to occur in less expensive small, single-serve, pressed pellets of ripe pu’erh … in pressed buttons known as a tuo or tuo cha (resembling a bird nest). It’s usually found in aged pu’erhs but can be found in other teas, too. Basically, a result of poor handling either during the fermentation process or long-term storage … an undesirable breakdown of bacteria in plant microbial matter also known, by those in the ‘know’, as ‘dried squid’ aroma.
The person who posted about the fishy taste also said it tasted like dirt. Bingo! Thank You. That was definitely the other tasting note I’d not been able to spit out earlier.
In all, I found around ten other reviews about the fishy tea I’m not naming and shaming … reviews revering other amazing qualities. There is no explaining some people’s taste! Heck – there’s even mention of the ‘fish broth aroma’ on this amazon, 5-year, aged, pu’erh. Never again. When you know. You know.
As Don Mei explains, tea needs to be held for at least a year and often 2 or 3 years to be certain it’s aged well and offending ferment aromas have dissipated. The chemical responsible is Trimethylamine (TMA). Its smell is described as rotting fish – even worse. Again, it’s part of a process and tea can’t be pressed too soon or improperly stored. Ageing it properly is a science.
Ewwww – Yup. So that was the inadvertent tea tasting experience that caused me to attempt a more deliberate, first tea tasting where I picked up my pencil, opened the page to my first tea journal and so it begins.
I hope you’ll join me as I continue to taste all the teas.
I bought a lot!
After saying I would follow up on this guest post on Kristen’s blog, I should probably be writing something more about all the things (and trust me there are lots of scrappy little things growing in many nooks and crannies around my place right now). ie, Every time I finish another Caesar Salad, I plunk a romaine end in the tray of water with all its friends. I’ve not gotten around to putting any in soil, yet, but I’m sure it might happen.
Spring is just around the corner.
I might wait and put them in a pot on the roof instead though.
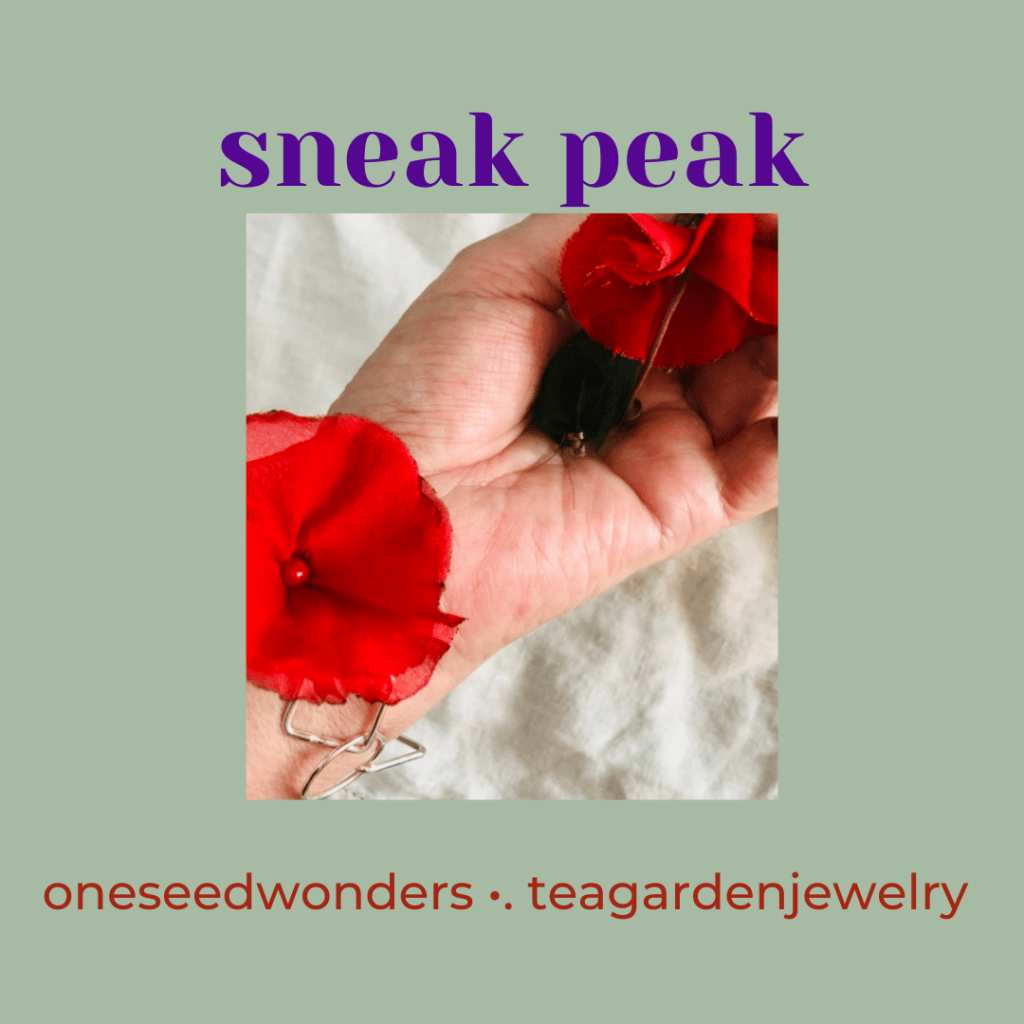
I’ve also been working in wire and other scraps … other botanical things that have been taking up a LOT of my time.
I just tweeted about this new endeavour … crafting a collection of chiffon pop-on poppies!

SPRING AHEAD – I’m working on other precious metal projects, too, and learning how to use miniature power tools that I recently wrote about here.
Anyone else got Spring Fever?

There’s a new Citrus Challenge going on again and it appears to be an ‘anything citrus’ goes so that opens it up. I’ll toss my 2nd ferment lemon ginger kombucha into the ring before the end of the month if someone takes me up on this and provides a guest post before the end of January.
I first participated two years ago and made my first real marmalade. Before this, I’d played around with hoards of extra zucchini from my garden and cooked up a pretty tasty fake marmalade …
Submit your post to brenda@gardenbre.com so I can add it to my blog.
And here’s where you can submit your entry if you want to officially join the Food In Jars community and continue with their monthly challenges … and post on your own blog. I only got as a far as the citrus challenge in January of 2017 but I am about to take up the challenge again for 2019 – if I get any takers this month.
Are you in?
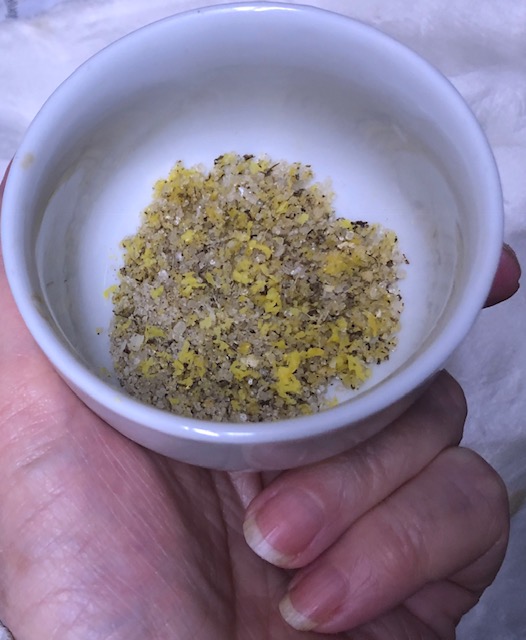
UPDATE: I took a look at jenny veleke’s salt recipe and added grated organic lemon peel using the Salamoia Bolognese recipe I started making years ago from Gayla’s recipe on You Grow Girl. It’s running a close 2nd as my favourite seasoning. I added my own touch to this marriage of both recipes and grated freshly ground black pepper into the mix.
Ready. Set. Go.
Check Out …

Looking for a new probiotic to add to your life?
This one’s fancy – if you look carefully, you can see the bubbles.
Normally, kombucha is not considered to be alcoholic – that is, if it is under .5% ABV (alcohol by volume). Often though, JUN rings in around 2%. Be forewarned. A tonic bar in Colorado had to get a liquor license to serve it!
I got my JUN SCOBY (symbiotic culture of bacteria and yeast) MOTHER on Etsy from Shanya’s Shop and only let this batch ferment for 3 days. Had I left it longer, there may have been more carbonation and a higher alcohol content; but I wanted to test it earlier rather than later in the suggested 3-5 day brewing cycle, for the sake of taste. Last time, thinking it was like traditional kombucha, I left it too long and it produced a concentrated, rather sour batch that while still drinkable needed to be diluted with water. Taste-wise, it’s not unlike the prebiotic apple cider vinegar drink, similarly made by adding few tablespoons to a glass of water. More often than not, I also add a little stevia to sweeten.
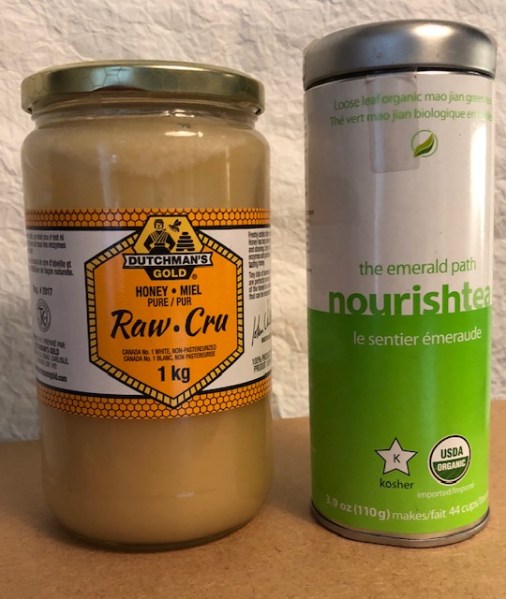
JUN kombucha is generally made using green tea and honey. Its origins are rather mysterious but it seems to have come from the East, some say Northern China and Tibet. It has a higher (good) bacteria count probably due to honey being used in its making and is more delicate than traditional kombucha.
There are numerous sites that describe how to make JUN and 2nd ferments that are yours for the googling. When you get your JUN SCOBY, though, it’s recommended you follow the directions provided. Only try other methods once you have a good supply of additional scobies in case experiments go wrong. Some people train sugar-brewed, black tea scobies with green tea and honey. It doesn’t produce what is known as a classic JUN, and from what I understand these scobies tend to break down over time; so hopefully, there are back up scobies to use again if this happens.
JUN, unlike black tea, sugar-brewed kombucha, reaches an alcoholic content of somewhere between 2-7% with its ABV slightly higher than traditional kombucha; again, possibly because of the honey. Many aficionados flavour-experiment using a variety of honeys (ie, alfalfa, acacia, lavender, orange blossom, etc) and some take this even further, in the 2nd ferment, and move into a mead-making territory.
JUN can also be brewed using a number of other teas, usually herbal, but again, it’s recommended that you hold back a JUN SCOBY mother so if experiments go sideways you still have one to create more from. In the past, I’ve successfully made it using hibiscus to create a bright pink, slightly fruitier drink and I’ve used butterfly pea flower tea and made an equally stunning, jewel-toned, turquoise brew.
JUN, again, unlike traditional black tea kombucha, is ready sooner and appreciates cooler temperatures (70°F versus 77). Its quicker 1st and 2nd fermentation times (1-2 days versus 7-10) means more work but also more of the probiotic drink which again can be an advantage, or a disadvantage depending on how much you wish to have on hand at any given time; and how much green tea and honey you want to go through.
Scobies can be left to rest, by leaving about a cup or so of the liquid with the mother scoby for extended periods of time as some concentrated brew is poured off and periodically fed with fresh green tea and honey as the liquid goes down in the jar AKA hotel (about every 4-6 weeks). The scobies can be dehydrated, as well, and will last in the refrigerator for a few months sealed in a plastic bag.

The process starts with making green tea … with boiling about 3 cups of water and adding a little cool, filtered water to the leaves (so it’s not too hot and doesn’t destroy any health benefits of the tea nor produce a bitter brew) … I wait until the container is cool enough to pick it up by hand before adding about 3/8 cup of honey. Use only plastic utensils as metal tends to degrade its potency and enzymes. I have a dedicated set of plastic sieves, spoons and glass eyedroppers (to test the brew). Once at room temperature, add the sweetened brew into about a half cup of the starter (liquid left from the last batch) with the JUN SCOBY.

Fruit flies LOVE these brews.
It’s important to always keep the jars covered with a breathable piece of material and a tight elastic at all times. If you look closely (where the elastic meets the paper towel, above) you can see why.

After the room-temperature, green tea and honey mixture is added, the cover is put back … and the wait begins … for about 3-5 days, and then a taste test is done to decide if it’s ready.
You can see from the photo of champs in the glass that the brew tends to retain the same cloudy appearance as the green tea and raw honey mixture that’s added to the starter. That is because of the honey and also the scoby with yeasts floating around in it. Hardened connoisseurs love this but the murky look and slimy texture can be off-putting – but the bacteria and floating yeast beasties are what ferments the tea and honey.

The muddiness settles after the jars sit on the counter and cloudiness will often further clear once, it, or 2nd ferments are put in the fridge and come to rest. I strain the liquid, though, through a sieve as I’m transferring it from the bottle into glasses and this, too, helps to make an even more pellucid liquid.
Once ready, I pour a celebratory glass of fizz and bottle up the rest (and date it using a glass marker) … all but about 1/2 cup which I leave in so the process of making a new batch can begin again.

Cheers!

Many years ago ~ back in 2015, I think it was, I went through the process of growing sweet potato slips … keeping an eye on them every 5 minutes as per Karen’s instructions here. I was dubious and up for the challenge even after mention was made of them not being easy to grow in Canada.
Half a decade earlier, I’d read on yougrowgirl.com about Gayla’s sweet potatoes in a bag and was impressed with the fact that at least the leaves could be boiled and eaten.

And so it appears, I even planted the slips I grew back in 2010.
I do remember putting down green garbage bags to pre-warm the soil, now that I think about it … and there are pictures to prove I planted all the slips (see below). I do not, however, ever remember harvesting anything … nor do I recollect ever eating any sweet potatoes … or any leaves
Solid. Facts. Nothing.
But …

So skipping right ahead to the middle of June 2018, after I’d totally finished planting everything I was going to plant in the garden for the year, I had finally gotten back to house-cleaning and other less important chores and whatnot … when didn’t I discover a couple of long-forgotten, organic, sweet potatoes that had sprouted in amidst the net of some old onion bags.
Well voila! I decided, if nothing else, these might grow a fine line of vines along the entrance fence and cover up some of the ugly along the path where others can see into my allotment plot. I didn’t bother to slip off the slips … just dug two, small, shallow holes … about a foot from one another and dropped each potato, slip side up, in and covered them up (but not the little vines).
I forgot about them, again, and they began to grow and I continued throughout the Summer to pretty well forget about them … almost completely. I did tuck leaves in and rewind vines back through the fence grid most visits to ensure neighbouring gardeners weren’t accosted by outstretched, needy, fingers of my progeny. Seriously, I can probably count on my own fingers and toes how many minutes of time they were given all season. And I totally forgot I could boil and eat the leaves.
My forgetfulness continued to the point, where it wasn’t until I got home and after what I thought was my last day in the garden, I’d slumped into an epsom bath relieved the day, the season, the year, was over and I realized I probably needed to go back to see if anything had actually grown below the soil … this after reading on one site about the damage they can do if left in … all their acid, or something or other, leaching into nearby areas … yes, I’d denuded the fence of dead black slimy vines and leaves, but I hadn’t given the two potatoes in the soil another thought. Obviously all the work of 2015 had left an indelible scar on my unconscious mind.
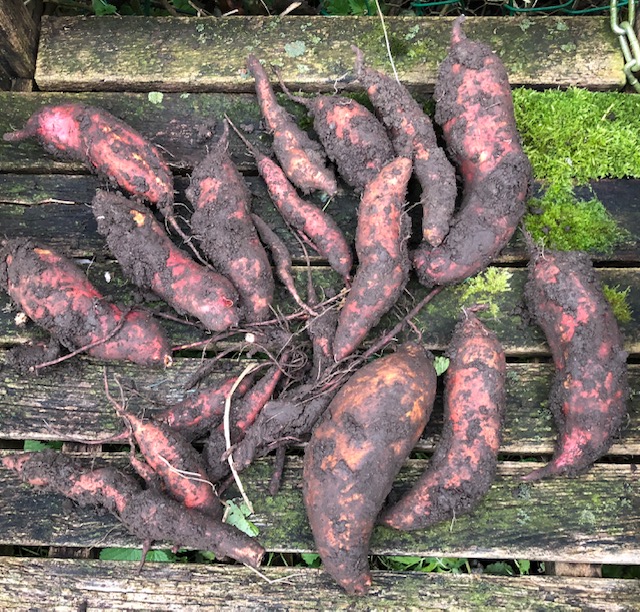
Back I went a week later and lo and behold, ka-ching – GOLD … tenfold what I’d put in.
One or two are the size of my baby fingers but most are a decent size. I am looking forward to having a mini side-dish of the little guys at some point.
New Year’s Eve – maybe. A celebration!

I left the soil on and am letting them dry before curing them in a cloth bag for a few weeks somewhere warm.
With any luck, a few will even live to sprout again.

This is an old post from my gardenbre days … written in my 4th year of gardening at the allotment. I’m beginning my 10th year now! Wow. How. Time. Flies.

Two pots on the stove. A reminiscence AND a segue from my prior post below.
In the small pot at the back are yellow and green tomatoes from my last garden haul, chopped & simmering, providing a nice colour change to the red pastes and it tastes quite fresh. It supposedly has a lower acid content than the red which is good for anyone with dietary issues … like my mother.
In the big pot at the front is a zucchini marmalade. I slightly altered a recipe I used from the cosmic cowgirl who said she got it from the BerNARdin Guide to Home Preserving magazine which I bought at Canadian Tire along with most of my canning gear (the cosmic cowgirl’s post doesn’t exist now so I’ve linked to this recipe). Instead of using fresh ginger and putting it into a cheesecloth bag with the pith, I sliced candied ginger in syrup and added it directly into the zucs, oranges, lemons and sugar. Even after hours on a slow boil, it only gelled to a little beyond a syrup but enough that it was spreadable and not pourable – there was little liquid left … just enough that I was able to spoon it over the top of the slaw to cover it. I will use it as a condiment with cheese and foie gras.

At back are jars of dark tomato sauce that was in the slow cooker on high for 3 days total (I would only have it on high for 2 days if I did it again – I think) or maybe on low for 3 days). That said, I still need to taste it on pasta to see if the flavour is too deep. It’s a work in progress. I will dilute it with the other sauce if necessary. I like the colour and think the layers of flavour will prove to be good so it was worth the experiment.
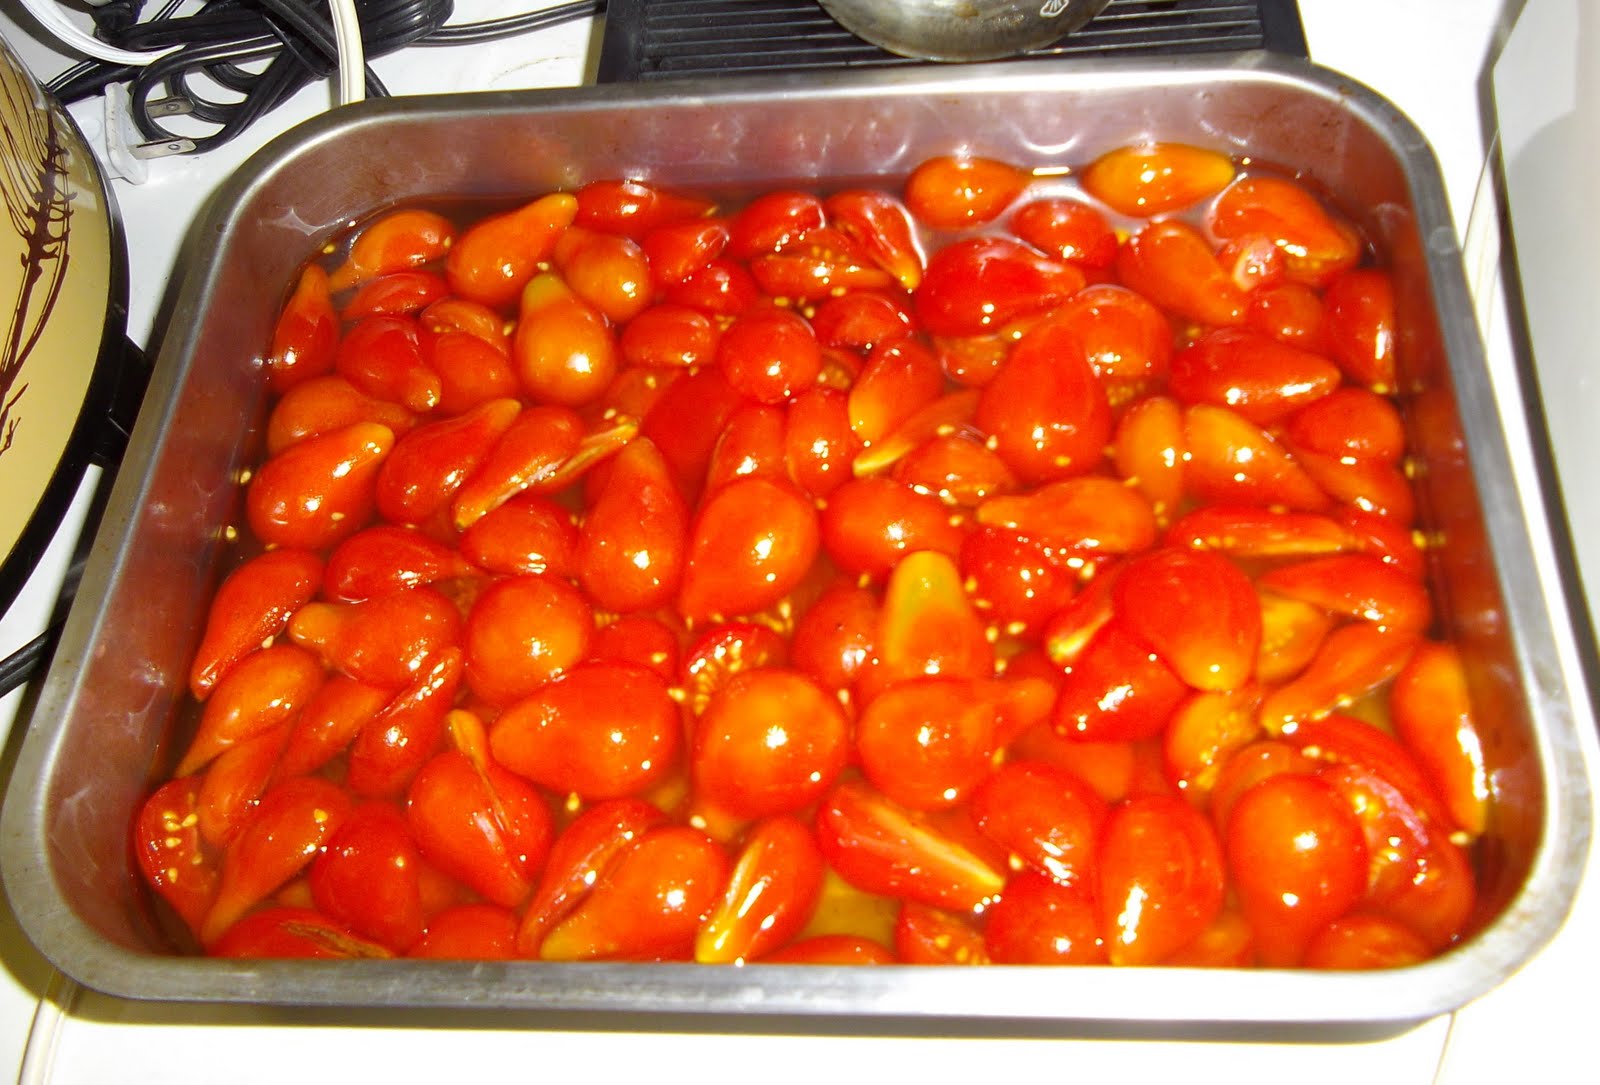
For this batch of San Marzano tomatoes, I made a simple syrup using organic golden cane and threw in a dash of pink salt harvested in the Andes Mountains. The salt gives it a bit of caramel taste. I poured the boiling syrup over the tomatoes and let them stew for over an hour then placed them in the dehydrator on high for a few hours with thick cut zuc chips dipped in syrup as well (eaten – so not shown)!

There is not a whole lot to say about a pot of pure chopped tomatoes slow cooking and filling a home with the rich smell of Summer harvest as the shivers of Autumn begin … hmmm
… or maybe there is …

I have finally figured out a system for labeling – writing directly on the lids with a laundry ‘sharpie’ works well with the metal lids because they can only be used to seal the jars once (I’m not sure yet how I’ll label my Tattie Lids which are reusable – I have to find a label that stays on yet is easy to remove once it’s done it’s job – the ones I got a year ago from Lee Valley already look like they’ve lost stickiness.
All in all – yesterday’s annual first day of water bath canning went well. There are dirty dishes galore piled on the floor waiting for some soap and water … and the kitchen, dining and living rooms look like a pack of wild animals were let loose to party in them … other than that … smooth as dupioni silk!
Note to Self – get a gel mat for the kitchen sink/stove area. Woah was Me & my aching back!
The Food in Jars Mastery Challenge 2017
had me at their first deliverable … Marmalade
 2 oranges/2 lemons
1-1/4 cups of water
1-1/4 cups of organic sugar
Boil for 1 hour and 45 minutes
This was my first time making it and I’m quite happy with the results. My absolute favourite is the Bon Maman Whole Slice Orange Marmalade which I first discovered in Paris … later I found some at the Atwater Market in Montreal, Quebec. There were no recipes I could find using whole orange slices so I’ve patched together a few recipes .
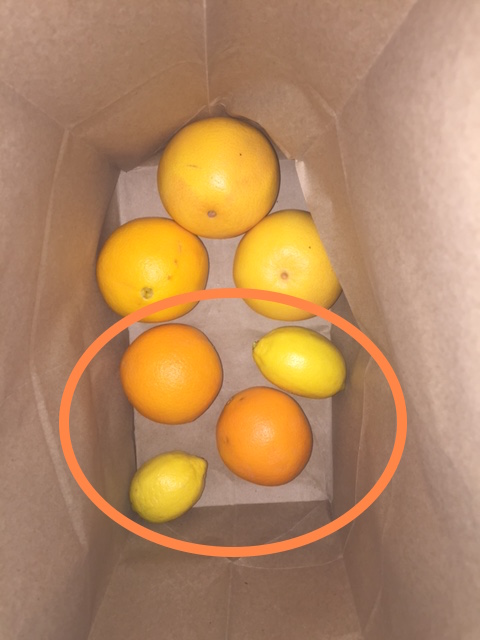
 I started off using two medium-sized organic oranges …
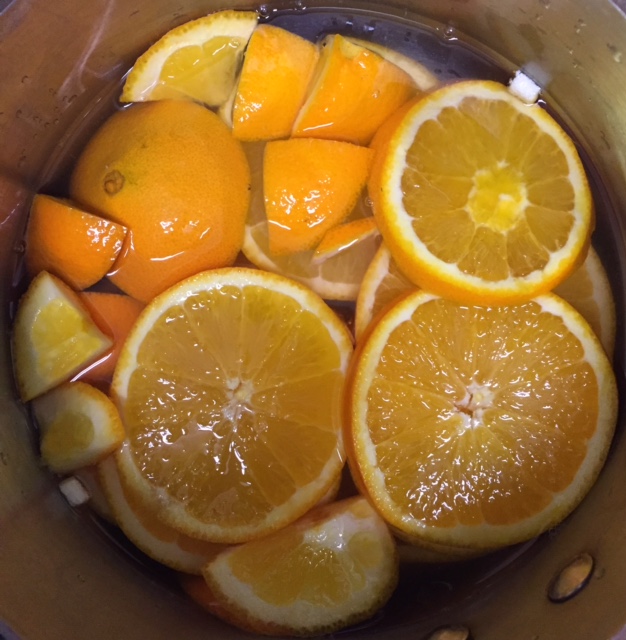 Then I sliced them about 1/4″ thick and found that about 2 and a quarter cups of water was enough to cover them in the pot I used.
After googling a few recipes, I discovered the reason many people boil their citrus first is to get rid of bitterness and since it’s the the bittersweetness of marmalade I love so much … what a win-win when I discovered what must be the simplest recipe on the entire internet. Basically you just use enough water to cover however much chopped citrus you’re using …
 then add the same amount of organic sugar as water (be sure to measure that H2O)!
 and boil it all for as long as it takes … to pass the wrinkle test. My batch took 1 hour and 45 minutes exactly until the surface of my last sample wrinkled … see Note on Setting Point by Christopher Robbins (no not that one – different spelling Pooh).
 What you need to know is at about 10 minutes in, I took the best orange slices out … I did this to stiffen them up so they could be standup bits for the sides of the jar while I poured the jam rather than having it all be one floppy-ploppy marmalade mess.
Leave it to Rachel Koo, one of my favourite chefs, to not only have a video using dehydrated orange slices because I’m using this part from her Orange Marmalade Tartlets recipe; but also she’s got one masterfully layered recipe using these and slices of fresh citrus and marmalade for tartlets – garnished with double cream and yogourt.
And yes, Rachel pulled her slices out after 5 minutes, but because I wanted to make sure they were really sweet, I gave mine twice as long in the boiling sugar water before placing them on parchment paper and into my toaster oven for about half an hour at about 200°F. I turned them over twice (and I know Rachel used a silpat baking mat and she didn’t flip hers but I was pretty sure they would surface dry faster if I did).
 When I took the best orange slices out, I realized I didn’t have a whole lot left in the pot of boiling sugar water so I thinly cut and peeled 2 lemons I had on hand to toss into the mix.
So here we are – ta da!
Since taking this photo, I topped the jar up with more syrup and it’s produced a nice layer of gel on top … sweet!
This is the most fun I’ve had since the holidays … plus all the running back and forth to the stove every 5 minutes doing patch taste tests (and no Mr. Robbins didn’t suggest taste tests to go with the wrinkle tests … but heck I do)!
 and there’s lots left over on the chef’s plate …
 and so I powdered up some of the organic sugar and covered some of the remaining slices to use someday as garnish on that tartlet of Rachel’s.
One of my favourite ways to use citrus marmalade is in a crepe suzettes flambe´. In this video, where the chef uses raspberry puree, I’d use one of the sliced oranges as a garnish on top rather than as a base. I also think rather than straight up whipped cream, I’d use Rachel’s double cream and yogourt combo, if anything … it really does stand on it’s own. Stay tuned for that recipe!
Here’s where and how to submit your marmalade (just remember to do it before 25 January). There’s also a closed FaceBook support group to cheer you on. If there hadn’t been, I’m not so sure I would have been as cool, calm and collected doing this my first time … who am I kidding, there wouldn’t have been a first time probably 😉
Here is the Food in Jars List of Challenges by Month
 And last but not least, Food in Jars has an amazing post on Trouble Shooting your Marmalade Making should things go sideways!

